


![Tataki de Atún: Receta Fácil con Salsa al Sésamo [Paso a Paso] - Bacalalo](http://bacalalo.com/cdn/shop/articles/tataki-de-atun-receta-facil-con-salsa-al-sesamo-paso-a-paso-1492742.jpg?v=1772706833&width=480)
Summary: Tuna tataki is one of the most impressive dishes you can prepare at home with minimal effort: a bluefin tuna loin, a very hot pan, 30 seconds per side, and a sesame sauce. In this complete guide, you'll find the step-by-step recipe, 4 different sauces (ponzu, soy-ginger, sesame, and sriracha-honey), the perfect searing technique with exact times and temperatures, pre-marinades, professional presentation, and everything you need to know about food safety with raw fish.
Contents
- What is tataki: origin and Japanese technique
- Difference between tataki, sashimi, tartare, and ceviche
- Which tuna to choose for tataki
- Comparison table: tuna qualities for raw consumption
- Ingredients for tuna tataki (4 servings)
- Step-by-step tuna tataki recipe
- The perfect sear: temperature and timing
- Homemade ponzu sauce for tataki
- 4 sauces for tuna tataki
- Pre-marinade: options and times
- Professional presentation: cut, arrangement, and garnishes
- Food safety: pre-freezing and anisakiasis
- Pairing: sake, wines, and beers
- Nutritional information for bluefin tuna
- Canned tuna and bonito: the gourmet alternative
- Frequently asked questions about tuna tataki
What is tataki: origin and Japanese technique
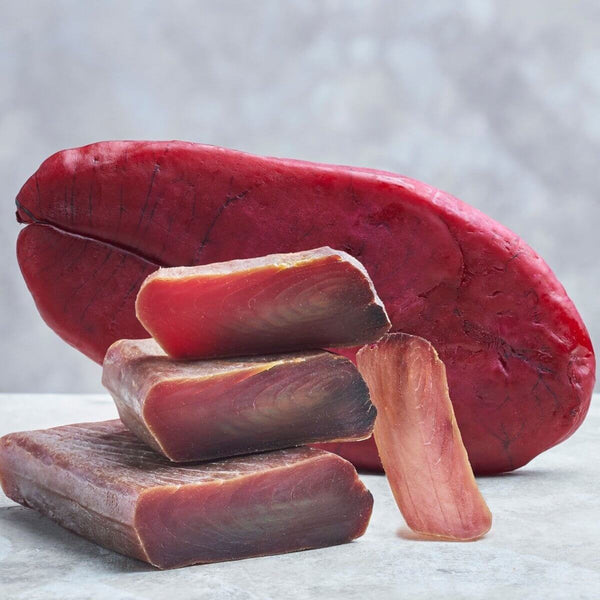
Tuna tataki (katsuo no tataki in Japanese) is a Japanese culinary technique that involves briefly searing a piece of fish over very high heat, leaving the interior completely raw. The result is a piece with a thin, golden, crispy crust on the outside and a silky, fresh, deep ruby-red texture on the inside.
The word tataki literally means "pounded" or "smashed," and refers to the traditional custom of lightly beating the fish after searing to help it absorb seasonings better. It originated in the Kochi region, on Shikoku island, where fishermen prepared bonito (katsuo) directly over rice straw fires.
What makes this technique special is its radical simplicity: you don't need to be a chef, you don't need special equipment, and the result looks like it came from a Michelin-starred Japanese restaurant. The key lies in two things: quality tuna and a really hot pan.
Over time, the technique has spread beyond Japan and has merged with Mediterranean cuisine, where we combine Atlantic bluefin tuna with ingredients such as extra virgin olive oil, sesame, soy, and citrus. It is, without a doubt, one of the most spectacular appetizers you can prepare at home in less than 15 minutes.
Difference between tataki, sashimi, tartare, and ceviche
These four dishes share a common ingredient (raw or semi-raw fish), but the technique, texture, and result are completely different. It is important to know the differences to avoid confusion:
- Tataki: the fish is briefly seared on the outside (20-40 seconds per side) over very high heat and served cut into thick slices. The outside is cooked, the inside is raw. Texture: crispy-silky contrast. It is marinated or served with sauce.
- Sashimi: completely raw fish, cut into thin slices and served without any heat treatment. The cut is the star. It is served with wasabi and soy. Requires the highest quality fish.
- Tartare: raw fish cut into small cubes (brunoise) and seasoned with soy, sesame, oil, avocado, or other ingredients. Everything is mixed together. Texture: uniform, fresh, juicy.
- Ceviche: raw fish "cooked" in citric acid (lemon, lime). The acid denatures proteins, changing color and texture. Result: opaque, firm, acidic. Latin American technique, not Japanese.
Tataki occupies a unique place because it combines the best of two worlds: the purity of raw fish with the smoky flavor and texture of searing. It is the perfect option for those who want to try oily fish in a lightly cooked form but are not daring enough for pure sashimi.
Which tuna to choose for tataki
The choice of tuna is 80% of the success of a good tataki. You need fresh, quality fish suitable for raw or semi-raw consumption. Here are the options:
Bluefin tuna (Thunnus thynnus) — the premium option
Bluefin tuna tataki is the most prized version. Atlantic or Mediterranean bluefin tuna has dense, dark crimson meat, with an intense, slightly metallic flavor and a buttery texture that melts in the mouth. It is the same tuna used in the best sushi restaurants in the world.
- Loin: the ideal cut for tataki. Compact, without nerves, uniform thickness.
- Belly (toro): the fattiest and most prized part. Spectacular for tataki, but harder to find fresh and more expensive.
- Indicative price: 35-60 euros/kg in a reliable fishmonger.
Yellowfin tuna (Thunnus albacares) — the accessible alternative
Also known as yellowfin or light tuna, it is milder than bluefin, with a lighter pink color and less intense flavor. It is an excellent option for those new to tataki or looking for a more delicate result. It is easily found in large supermarkets and fishmongers.
- Indicative price: 18-30 euros/kg.
- Flavor: milder, less fatty, slightly sweet.
Fresh vs. frozen
For tataki, you can use both fresh and frozen tuna. In fact, if you are going to consume it semi-raw (which is the case), Spanish health regulations require that the fish has been previously frozen at -20 °C for at least 48 hours to eliminate the risk of anisakiasis. Many fishmongers already sell tuna "suitable for raw consumption" with this freezing already done. Always ask.
If you buy quality frozen tuna (labeled "sashimi grade" or "sashimi quality"), the result is practically identical to fresh. Always thaw in the refrigerator, never at room temperature or in the microwave.
Comparison table: tuna qualities for raw consumption
| Variety | Color | Flavor | Fat | Price/kg | Ideal for |
|---|---|---|---|---|---|
| Bluefin tuna (Thunnus thynnus) | Dark crimson | Intense, umami | High | 35-60 euros | Premium tataki, sashimi |
| Yellowfin tuna (yellowfin) | Pinkish-red | Mild, sweet | Medium | 18-30 euros | Tataki, tartare, poke |
| Albacore tuna (bonito del norte) | Pale pink | Delicate, fine | Medium-high | 15-25 euros | Mild tataki, preserves |
| Bigeye tuna (bigeye) | Intense red | Rich, fatty | High | 30-50 euros | Sashimi, tataki |
If you want to delve deeper into the differences between albacore tuna and tuna, we have a complete guide on albacore tuna vs. tuna that will help you choose wisely.
Ingredients for tuna tataki (4 servings)
Here is the list of ingredients to prepare a classic sesame tuna tataki for 4 people as a generous appetizer or starter. Total time: 15 minutes (plus optional marinating).
For the tuna
- 400 g fresh bluefin tuna loin (sashimi quality, previously frozen 48h at -20 °C)
- 3 tablespoons sesame seeds (mix of white and black)
- 2 tablespoons toasted sesame oil
- 1 tablespoon extra virgin olive oil (for the pan)
- Flaky sea salt (Maldon or similar)
- Freshly ground black pepper
For the base sauce (soy-sesame)
- 4 tablespoons soy sauce (preferably tamari or low-salt soy)
- 1 tablespoon toasted sesame oil
- 1 tablespoon rice vinegar
- 1 teaspoon honey
- 1 teaspoon freshly grated ginger
- 1 teaspoon toasted sesame seeds
For the garnish
- 1 ripe avocado (optional but recommended)
- Fresh chives or spring onion
- Daikon radish or radishes (thinly sliced)
- Tender shoots (mizuna, arugula, or watercress)
Step-by-step tuna tataki recipe
The tuna tataki recipe is deceptively simple. There's no long cooking, no sauces to reduce for hours, no doughs to rise. It's 8 direct steps and in 15 minutes you'll have a Japanese restaurant-quality dish on your table.
- Temper the tuna: take the tuna loin out of the refrigerator 15-20 minutes before cooking. Fish at room temperature sears better and more evenly. Dry it well with paper towels; moisture is the enemy of searing.
- Season the loin: brush the tuna with toasted sesame oil on all sides. Season generously with salt and pepper. Roll the loin in the sesame seeds, pressing firmly so they adhere well to the entire surface. You want an even, dense coating.
- Heat the pan: place a cast iron or stainless steel pan over maximum heat for 2-3 minutes. It needs to be very hot: if you drop a drop of water, it should evaporate instantly. Add a tablespoon of olive oil (high smoke point) just before putting in the tuna.
- Sear the first side: place the loin in the pan and do not touch it for 30 seconds. You will hear an intense sizzle: that's a good sign. The goal is to create a golden crust of 2-3 mm without the heat penetrating to the center.
- Sear the second side: flip the loin with tongs (never with a fork, which perforates the meat and loses juices) and sear for another 30 seconds. If your loin is rectangular, also sear the sides (10-15 seconds each).
- Thermal shock: remove the tuna from the pan and immediately place it on a cold board or, even better, wrap it in cling film and put it in the refrigerator for 5 minutes. This thermal shock stops residual cooking and keeps the center raw.
- Prepare the sauce: while the tuna rests, mix all the sauce ingredients in a bowl. Taste and adjust: more soy if you want more salt, more honey if you want more sweetness, more ginger if you want more freshness.
- Cut and serve: with a very sharp knife (moistened in water), cut the loin into slices 8-10 mm thick. Arrange on the plate, drizzle with the sauce, add the garnish, and serve immediately.
The result: slices with a golden ring on the outside and a bright red, juicy, and silky center. Spectacular to the eye and on the palate.
The perfect sear: temperature and timing
Searing is the critical moment for tataki. Too long and you overcook the interior. Too short and you don't get the crust. This table gives you the exact times according to the thickness of the loin:
| Loin thickness | Time per side | Pan temperature | Internal result |
|---|---|---|---|
| 3-4 cm (thin) | 20-25 seconds | 260-280 °C | Raw center, 1-2 mm sear |
| 5-6 cm (standard) | 30-40 seconds | 260-280 °C | Raw center, 2-3 mm sear |
| 7-8 cm (thick) | 40-50 seconds | 260-280 °C | Raw center, 3-4 mm sear |
| Sides (any thickness) | 10-15 seconds | 260-280 °C | Surface crust only |
Key tips for searing:
- Do not move the loin: place it and do not touch it until it's time to flip. If you move it, the crust will not form.
- Cast iron pan: retains heat better than steel. If you only have a non-stick pan, preheat longer.
- Ventilate the kitchen well: high-temperature searing generates smoke. Open windows or turn on the extractor fan before starting.
- Oil with a high smoke point: virgin olive, sunflower, or avocado. Toasted sesame oil has a low smoke point (170 °C), so it is only used for marinating, not for the pan.
- Count the seconds: use your phone's timer. The difference between 30 and 50 seconds is huge in the final result.
Homemade ponzu sauce for tataki
Ponzu sauce is the classic Japanese accompaniment for tataki. It is a blend of soy, citrus, and dashi that perfectly balances the flavor of raw tuna with acidity, umami, and freshness. You can buy it pre-made, but the homemade version is infinitely better.
Ingredients (for 150 ml)
- 60 ml soy sauce
- 40 ml freshly squeezed lemon juice
- 20 ml orange juice
- 20 ml rice vinegar
- 10 ml mirin (sweet rice wine)
- 1 teaspoon dried bonito flakes (katsuobushi) — optional but authentic
Preparation
Mix the soy, citrus, vinegar, and mirin in a glass jar. If using katsuobushi, add it and let it steep in the refrigerator for at least 4 hours (ideally overnight). Strain before serving. Without katsuobushi, the ponzu is ready instantly.
Homemade ponzu can be stored in the refrigerator for up to 2 weeks in a sealed jar. It is versatile: it can be used for tataki, sashimi, salads, gyoza, and any dish that needs a touch of soy with citrus.
4 sauces for tuna tataki
Beyond ponzu, there are four sauces for tuna tataki that work spectacularly and allow you to vary it each time you prepare it:
1. Soy-ginger sauce
The simplest and most direct. Mix 4 tablespoons of soy sauce with 1 tablespoon of freshly grated ginger, 1 teaspoon of toasted sesame oil, and a few drops of lime juice. Ideal if you want to respect the tuna's flavor as much as possible.
2. Sesame sauce
Perfect for sesame tuna tataki. Toast 2 tablespoons of sesame seeds in a dry pan, lightly crush them in a mortar. Mix with 3 tablespoons of soy sauce, 1 tablespoon of sesame oil, 1 teaspoon of rice vinegar, and 1 teaspoon of sugar. Result: grainy texture, toasted flavor, very Japanese.
3. Mediterranean citrus sauce
Here we fuse Japan with the Mediterranean. Mix 3 tablespoons of extra virgin olive oil, 2 tablespoons of lemon juice, 1 tablespoon of soy sauce, lime zest, 1 teaspoon of honey, and chopped chives. Result: fresh, fruity, with the richness of olive oil. Works wonderfully with smoked salmon toasts too.
4. Sriracha-honey sauce
For those looking for a spicy and sweet kick. Mix 2 tablespoons of sriracha, 2 tablespoons of honey, 1 tablespoon of soy sauce, 1 teaspoon of rice vinegar, and 1 teaspoon of sesame oil. Result: explosive, addictive, and with a sweet-spicy balance that pairs incredibly well with raw tuna.
Pre-marinade: options and times
Marinated tuna tataki takes the dish to another level. Marinating before searing infuses the tuna with flavor and creates an aromatic layer that caramelizes upon contact with the hot pan. It is not mandatory, but recommended.
Classic Japanese marinade (30 minutes)
Mix 3 tablespoons of soy sauce, 1 tablespoon of sake (or dry white wine), 1 tablespoon of mirin, and 1 teaspoon of grated ginger. Dip the tuna loin in this mixture, cover with cling film, and refrigerate for 30 minutes. Pat dry with paper towels before searing.
Quick Marinade (10 minutes)
If you don't have much time, simply brush the loin with soy sauce and toasted sesame oil. Let it rest for 10 minutes at room temperature. The soy sauce adds umami and helps the sesame adhere better.
Long Marinade (2-4 hours)
To intensify the flavor: 4 tablespoons of soy sauce, 2 tablespoons of mirin, 1 tablespoon of sesame oil, 1 sliced garlic clove, and sliced ginger. Refrigerate for 2 to 4 hours maximum. More than 4 hours, and the soy sauce starts to "cook" and darken the tuna.
Important Rule: regardless of the marinade you choose, always pat the loin dry with paper towels before searing. If the tuna is wet, the pan loses temperature, and instead of searing, you end up cooking the fish. This step makes all the difference between a perfect tataki and a mediocre one.
Professional Presentation: Cutting, Arrangement, and Garnishes
The presentation of tataki is as important as its preparation. This is a visual dish by nature: the contrast between the golden exterior with sesame and the ruby red interior is what makes it irresistible. Here are the keys to a restaurant-quality presentation.
The Cut
- Thickness: 8-10 mm. Not thinner (it falls apart) nor thicker (it loses elegance).
- Knife: use the sharpest one you have. A Japanese knife (yanagiba) is ideal, but any well-sharpened chef's knife will do. Moisten the blade in water before each cut to ensure it glides without tearing.
- Angle: cut slightly diagonally to get oval, wider, and more attractive slices.
- Movement: a single long stroke, without sawing. If you have to make several movements, your knife is not sharp enough.
Arrangement on the Plate
- Plate: white, plain, without decoration. The tuna is the star.
- Arrangement: slices slightly overlapping in a semicircle or in a straight line. Leave space between each slice to appreciate the interior.
- Sauce: never directly on top. Make a puddle of sauce on the side or a thin line along the edge of the plate. Serve the rest in a separate bowl.
Garnishes that Work
- Avocado: thinly sliced or diced, it adds creaminess and contrast.
- Daikon: grated or finely julienned. Crispy freshness, very Japanese.
- Wakame: hydrated seaweed, adds an authentic taste of the sea.
- Tender shoots: arugula, mizuna, or watercress. Mild bitterness that balances the tuna's fat.
- Extra toasted sesame seeds: sprinkled on top at the end.
- Chives or spring onion: finely chopped, adds freshness and green color.
Food Safety: Pre-freezing and Anisakis
This section is non-negotiable. Tataki is a dish with a raw interior, and tuna is one of the fish most susceptible to anisakis, a parasite that can cause severe allergic reactions and serious gastrointestinal problems.
The Spanish Regulation
Royal Decree 1420/2006 and EC Regulation 853/2004 require that any fish intended for raw or semi-raw consumption (tataki, sashimi, tartare, ceviche, pickled anchovies) must have been subjected to:
- -20 °C for at least 48 hours (household freezer with 3 or 4 stars)
- -35 °C for at least 15 hours (industrial freezers)
What to Do in Practice
- Buy tuna "suitable for raw consumption": many fishmongers already sell it frozen and specifically labeled for sushi/tataki. This is the safest option.
- If you buy fresh: freeze it yourself at -20 °C for a minimum of 48 hours. Make sure your freezer reaches this temperature (check with a thermometer).
- Defrost in the refrigerator: never at room temperature. Take the tuna out the night before and leave it in the refrigerator, wrapped in absorbent paper on a plate. Defrost slowly and safely.
- Visually inspect: before preparing the tataki, examine the loin. Good quality fresh tuna has a uniform color, no dark spots, no strong fishy odor (it should smell like clean sea).
Do not skip this step. No dish is worth a health scare. With proper freezing, the risk of anisakis is completely eliminated, and you can enjoy tataki with complete peace of mind.
Pairing: Sake, Wines, and Beers
Tuna tataki has a complex flavor profile: umami from the tuna, toastiness from the sesame, acidity and saltiness from the soy sauce, freshness from the ginger. The ideal pairing should complement without competing.
Sake
The most natural pairing. A slightly chilled junmai ginjo (10-12 °C) is the perfect choice: fruity, clean, with enough body to accompany red tuna without overpowering its flavor. If you prefer something drier, a classic junmai works just as well.
White Wines
- Albariño: Atlantic salinity, citrus, fresh acidity. Excellent pairing with the tuna's fat.
- Verdejo: herbaceous, with a medium body. Works well with sesame sauces.
- Chablis (unoaked Chardonnay): mineral, acidic, elegant. The classic European choice for raw fish.
- Dry Riesling: acidity, citrus, and a hint of petrol minerality. Extraordinary with ponzu sauce.
Craft Beers
- Pilsner: clean, carbonated, light. Cleanses the palate between bites.
- Wheat beer: soft, slightly cloudy, notes of banana and clove. Complements without dominating.
- Mild IPA: hops can compete with tuna, so choose an IPA with moderate bitterness (30-40 IBU maximum).
What to avoid: red wines with high tannins, very bitter beers, and any drink with strong flavors that would overpower the delicate taste of tuna. The fish is the star, not the drink.
Nutritional Table for Bluefin Tuna
Bluefin tuna is one of the most nutritious fish available. It is an exceptional source of high-quality protein, omega-3 fatty acids, and essential micronutrients. These are the values per 100g of raw bluefin tuna:
| Nutrient | Amount per 100g | % Daily Value* |
|---|---|---|
| Calories | 144 kcal | 7% |
| Proteins | 23.3 g | 47% |
| Total Fats | 4.9 g | 6% |
| Omega-3 (EPA + DHA) | 1.3 g | More than 100% recommended |
| Carbohydrates | 0 g | 0% |
| Vitamin D | 7.2 mcg | 36% |
| Vitamin B12 | 9.4 mcg | 392% |
| Selenium | 36.5 mcg | 66% |
| Iron | 1.3 mg | 7% |
| Phosphorus | 254 mg | 36% |
| Niacin (B3) | 18.5 mg | 116% |
*Based on a 2,000 kcal diet. Source: BEDCA (Spanish Food Composition Database) and USDA.
Tuna tataki is not only delicious but also a nutritionally dense dish: high in protein, rich in omega-3, carbohydrate-free, and with an exceptional vitamin contribution. It's an ideal choice for protein diets, ketogenic diets, or simply for those who want to eat healthy without sacrificing pleasure.
If you're interested in learning more about the nutritional properties of oily fish and their benefits, we have an article dedicated to it.
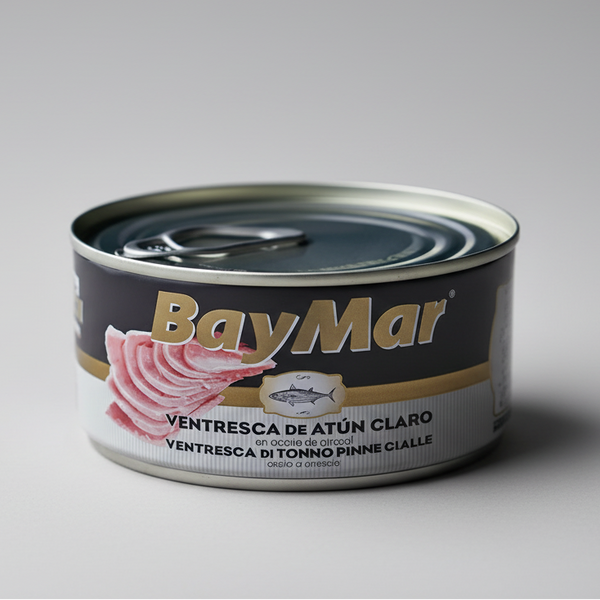
Canned Tuna and Bonito: The Gourmet Alternative
Although tataki is made with fresh tuna, gourmet canned tuna and bonito del norte are a perfect addition to your pantry. A belly fillet of bonito in olive oil is an instant luxury appetizer, and light tuna loins are the ideal base for salads, toasts, and quick, restaurant-quality sandwiches.


If you enjoy tataki and want to explore other raw and marinated fish formats, we recommend our premium smoked salmon collection, where you'll find hand-cut pieces and sashimi-grade salmon with a Japanese cut.
Smoked Salmon: Japanese Cut and Alternative Preparations
Tataki is not the only way to enjoy premium fish with Japanese technique. Gravlax-style marinated salmon is another spectacular preparation you can master at home. And if you prefer something ready to serve, our smoked salmon pieces with a Japanese cut are an immediate and elegant alternative.


🛒 Products mentioned in this article
⭐ 4.9/5 · Cold shipping 24-48h · Since 1990 at Mercat del Ninot
Frequently Asked Questions About Tuna Tataki
Can tataki be made with frozen tuna?
Yes, absolutely. In fact, it is recommended for food safety. Buy frozen tuna labeled "sashimi grade" or "suitable for raw consumption." Defrost it in the refrigerator the night before and pat it very dry with paper towels before searing. The result is practically identical to fresh tuna.
How long should tuna be seared for tataki?
Between 20 and 50 seconds per side, depending on the thickness of the loin. For a standard 5-6 cm loin, 30-40 seconds per side over maximum heat is the perfect point. The interior should remain completely raw and red. Use a timer to be precise.
Is it safe to eat raw tuna at home?
Yes, as long as the tuna has been previously frozen to -20 °C for at least 48 hours to eliminate the risk of anisakis. This is mandatory under Spanish health regulations. Buy from trusted fishmongers and ask if the product has been frozen for raw consumption.
Which pan is best for making tataki?
The best option is a cast iron pan: it retains heat very well and allows for stable high temperatures. The second option is stainless steel. Avoid non-stick pans: they don't reach a high enough temperature and the coating can deteriorate over high heat.
Can tataki be made with fish other than tuna?
Yes. The tataki technique works with salmon, bonito, swordfish, sea bass, and sea bream. Salmon is the second most popular option. You can even make beef tataki (wagyu tataki is a classic). The key is always high-quality raw material and quick searing at high temperatures.
How do you store leftover tataki?
Seared tataki can be stored in the refrigerator, tightly wrapped in plastic film, for a maximum of 24 hours. Do not freeze it after searing. Ideally, prepare only the amount you plan to consume, as tuna loses texture and color after a few hours once cut.
Can I make tataki without sesame?
Yes. Sesame is a classic topping but not mandatory. You can sear the tuna with just salt and pepper, or coat it with spices like Sichuan pepper, crushed coriander seeds, pink peppercorns, or even a blend of crushed nori seaweed. The searing works the same way.
What's the difference between bluefin tuna tataki and yellowfin tuna tataki?
Bluefin tuna (Thunnus thynnus) has a more intense flavor, higher fat content, a dark garnet color, and a more buttery texture. Yellowfin tuna is milder, pinkish-red, and has a more delicate flavor. Both are excellent for tataki; bluefin is the premium version and yellowfin is the more accessible alternative.
Can the sauce be prepared in advance?
Yes, all the mentioned sauces can be prepared hours or even days in advance. Homemade ponzu improves after resting in the refrigerator for at least 4 hours. The soy-ginger sauce and the sesame sauce can be stored in a sealed jar in the refrigerator for up to 5 days.
How many calories are in a serving of tuna tataki?
A typical serving of tuna tataki (100g tuna + sauce + sesame) provides approximately 200-220 kcal, 25g protein, 8-10g fat (mostly unsaturated), and less than 3g carbohydrates. It is a nutritionally dense dish, high in protein and low in carbohydrates.
What are the best side dishes for tataki?
Classic garnishes include sliced avocado, grated daikon, wakame (seaweed), tender greens (arugula, mizuna, or watercress), chopped chives, and sliced radishes. For a more substantial version, you can serve it over warm sushi rice or alongside a Japanese cucumber salad with rice vinegar.
Can I make tataki on the grill or with a torch instead of a pan?
Yes, both methods are valid. Charcoal grilling (especially Japanese binchotan) adds an extraordinary smoky aroma. A kitchen torch allows for precise searing, controlling the exact area. In both cases, the principle is the same: intense heat for a very short time, leaving the interior raw.
Discover more
Discover our premium selection
Seafood products carefully selected since 1990 at Mercat del Ninot, Barcelona. Refrigerated delivery in 24-48h.


![Salmón Marinado Casero: Receta Nórdica Gravlax Paso a Paso [Fácil] - Bacalalo](http://bacalalo.com/cdn/shop/articles/salmon-marinado-casero-receta-nordica-gravlax-paso-a-paso-facil-8788777.jpg?v=1772706831&width=480)

